This work is licensed under a Creative Commons Attribution-ShareAlike 4.0 International License.
About
Last Updated on September 2018
Created by Sri Sai Maharshi Kondapaneni
Creating Professional Videos: Tips and Tricks
Table of Contents
- Getting Started
- Filming
- Editing
- Introduction
- Navigating the timeline
- Finesse the audio
- Titles
- Color correction
- Exporting a Project
Getting Started
- Make a Plan
- Brainstorm ideas
- Write a Script (Plus, this will help with accessibility)
- Rehearse (easier than lots of editing together multiple takes)
- Select and Test your equipment
- Faculty Recording Studio (see use instructions below)
- Can capture both video and content (PowerPoint slides from your laptop or iPad, etc.)
- Use your own devices (most smartphones/tablets will produce decent recordings)
- Combination
- Non-technical equipment – Be creative, but think through the logistics!
- White boards
- Art supplies
- Props
- Whatever else you can imagine
- Faculty Recording Studio (see use instructions below)
Filming
- Using own devices
- Do not shoot in portrait mode. These videos will have a large border in YouTube.
- Test the audio and video before doing your final recording.
- If shooting outdoors, be wary of the wind. This is very hard to remove in the editing process.
- Using the Faculty Recording Studio
- In the Digital Scholarship Lab (Hours: M-F 8AM-5PM)
- After hours and weekend slots are available by advance appointment.
- In the Digital Scholarship Lab (Hours: M-F 8AM-5PM)
- Reserve the room at http://oudigitalscholar.com/room-booking/
- Can capture video/audio of speaker + plus content from a device (slides, images, etc.)
- Bring a flash drive to save your recording!
Editing
-
Wide variety of editing software available. Some of the more popular options are iMovie and Adobe Premiere. The computers in HCLC have this software installed. If you want to use iMovie, you can check out MacBook from the Library’s circulation desk.
- Lynda.com is a great resource for explore the different software options.
- http://www.ou.edu/ouit/learning/lynda.html
- You can set up an appointment with Sarah for more guidance on iMovie (http://libcal.ou.edu/appointment/9555).
Introduction
Adobe Premiere Pro is a timeline-based video editing app developed by Adobe Systems and published as part of the Adobe Creative Cloud licensing program. First launched in 2003, Adobe Premiere Pro is a successor of Adobe Premiere (first launched in 1991). It is geared towards professional video editing, while its sibling, Adobe Premiere Elements, targets consumers market. Once Adobe Premiere loads up you will get a view like this:
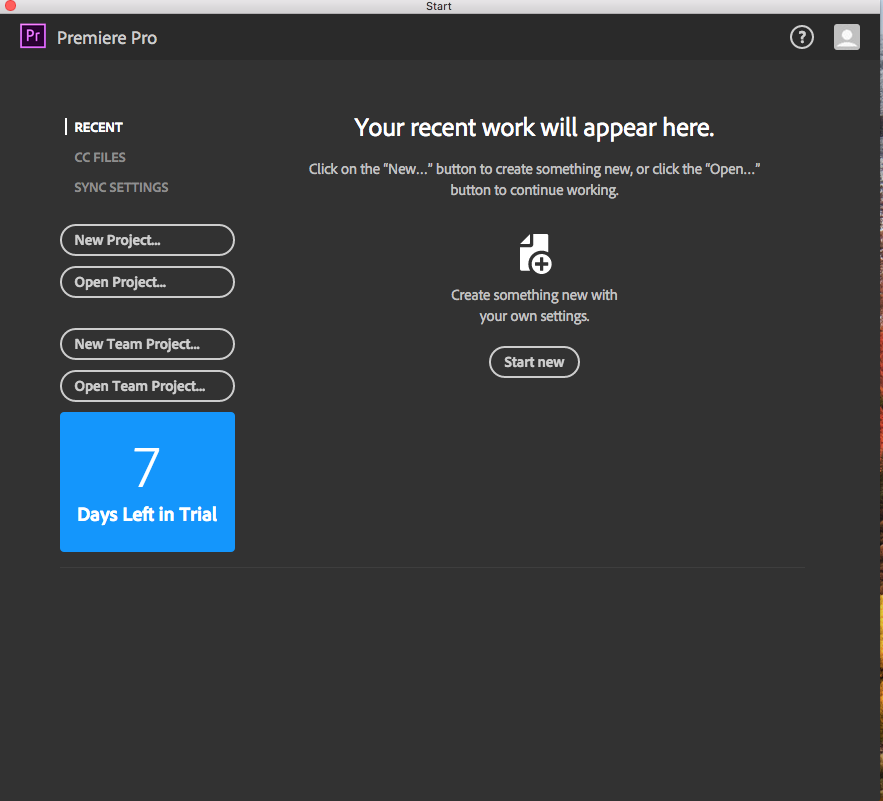
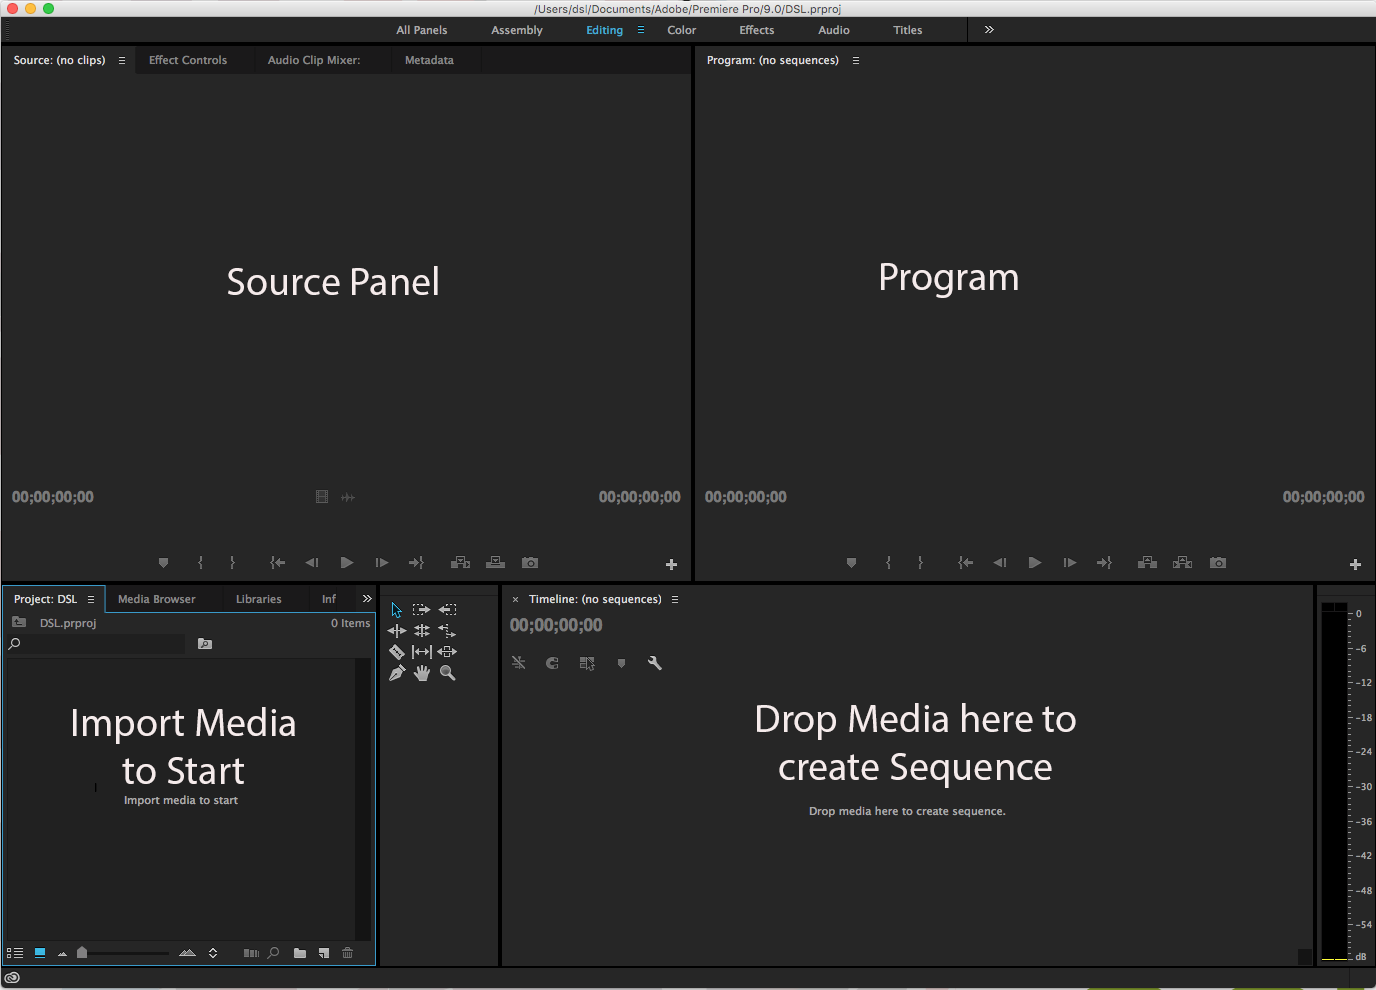
Start by clicking on create a new project, add a Name for your project and click Ok at the bottom of the screen. Now you will get a screen similar to the image below, which is the main screen where we will be working on. It has four main workspaces: Source, Project Panel, Program, Timeline.
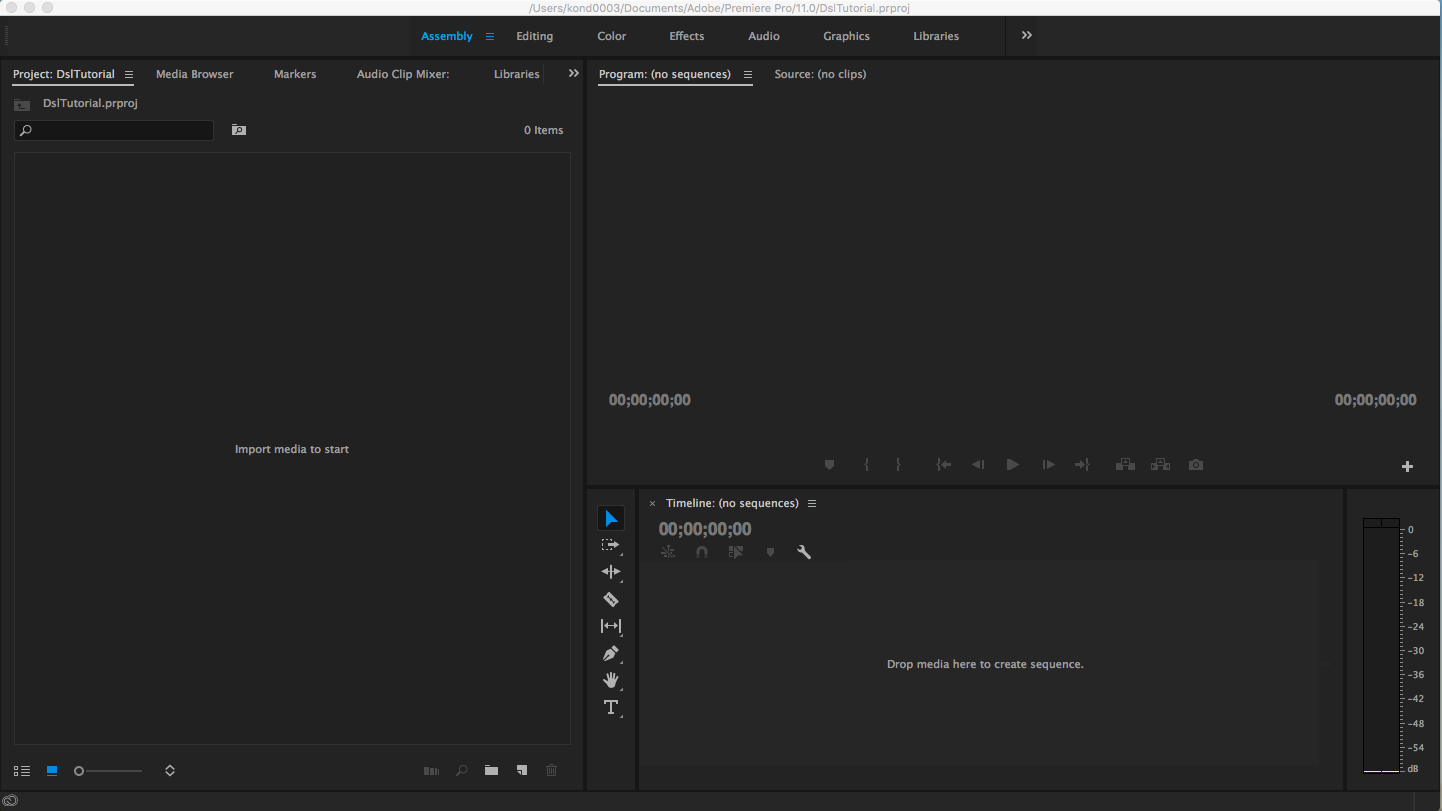
Also, in the top navigation there are additional tabs for refining your video: Assembly, Editing, Color, Effects, Audio, Graphics, Libraries. Assembly (image above) is the place where once we have completed the video, we check everything to make sure it is in sequence or not.

Editing (image above) is the place where we perform the editing of the video by dragging and placing them in the sequence and going with the theme of the video. Color is the place we work in making the changes to the saturation and adjust the brightness levels.

Audio this is the place where we concentrate on the only audio of the video we are planning of making and Graphics is the place we work on editing the text and the graphics we will place in the video.
Start Creating your Video
The editing panel of the Adobe Premiere Pro is the first place we begin, so start by clicking on Editing in the top navigation.
Organisation
If you spend a few minutes at the start of your project organizing all your assets, it can save you hours later looking for specific clips. The Project Panel: Anything you import into Premiere will appear in the Project Panel. Along with many tools for browsing your clips and metadata, the Project Panel has folders called bins, which you use to organize everything.
Bins:
- Have the same icon as a folder on your hard drive and work almost the same way.
- Store your clips in a more organized way, by dividing them into groups.
- Bins do not exist outside the Premiere project. You will not see them on your hard drive.
Creating bins:
- Click the ‘New Bin’ button at the bottom of the Project panel.
- Name your Bin.
There are four main panels. The first one you need to know is the Project Panel on bottom left-hand side. This is the place where you can import videos to your workspace.
You can import in two ways:
One way is that when you double-click on the project panel it opens a window from where you can import video files.
The second one is go to finder -> find the videos or images you are looking for and just drag and drop them into the window. One of the nice features in Adobe Premiere is that if you place the pointer on the file it just plays the file in the thumbnails.
The window on top of the left-hand side is called Source. The bottom right-hand side window is called Timeline, which is where you will be editing your videos. The window in the top right-hand side is the place where you can see the preview of your edited video.
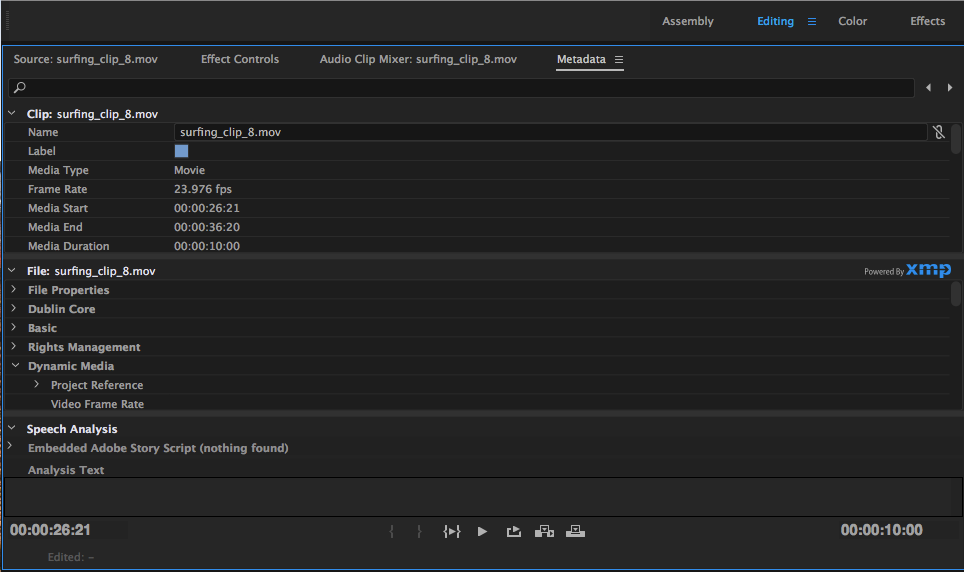
Now lets select a clip so we can start creating the video and move it to the Source panel. Once you have selected the clip make sure you go to the Metadata tab to check the framerate of the clip just to make sure that it’s the same framerate of the video you want to make.
You can set an in-point and an out-point in the video if you don’t want to have a particular portion of the video. While the video is playing to create an inpoint click on the “{” button in the source panel and put ”}” (the outpoint) until where we want the video Now We can just drag and drop the video to the timeline by placing your cursor on the film clip icon located below the video clip.
Navigating the timeline
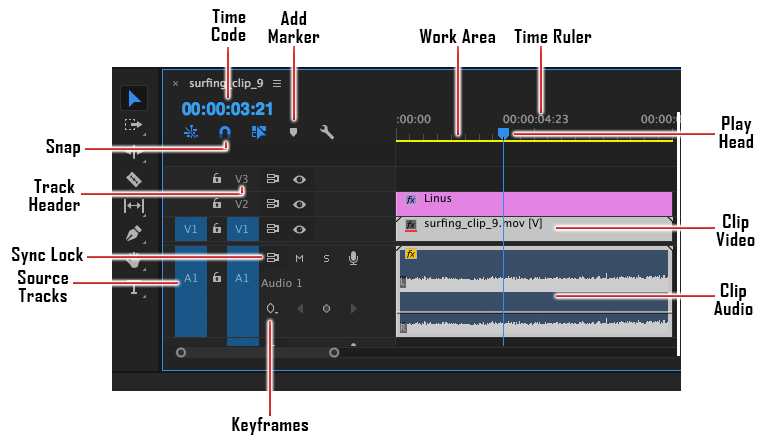
If the Project panel is the shelving for your project, then the Timeline panel is the canvas. The Timeline is where you will add clips to your sequences and edit them, which includes adding audio, images, titles, and special effects.
Changing in out points and closing gaps
You can change the In point or the Out point of a clip in the timeline by using the Selection tool. Place your cursor over either end of a clip until it changes into a red bracket with a double arrow through it. This is your trim Tool (Trim-in or Trim-out, depending on whether your at the beginning or end of a clip), also known informally as the Red bracket Tool. Click and drag in either direction to shorten or lengthen the clip.
If we get gaps between the videos. Right-click to highlight the gap between clips and press the delete or backspace keys to close the gap. All clips to the right of the gap will move left. This is called a ripple delete.
Moving the playhead in the timeline
The blue-line which you are seeing in the timeline is called play head.
You can click and drag the playhead to move it to a desired location, or simply click in the time ruler to move the playhead to that location.
Reordering clips
Once clips are in the timeline, we can use the Selection Tool to click and drag them to a different position in time or to a different track.
By default, this is an Overlay edit: if we move a clip forward in time it will write over the existing clip for the duration of the clip we are moving. We can use an Insert edit by holding down the Command [CTL] key. When you drag the clip to a different time, it will push other clips back to its tail end and not write over any part of the previous clip. Experiment to see the difference in moving clips with and without the Command key modifier.
The best way to ensure you don’t accidentally overwrite a clip when you are creating space on the timeline is to use the track selector forward tool. This tool highlights all the clips to the right (or to the left if you hold down the shift key) and allows you to move them as a unit.
Unlinking and relinking (video and audio) clips
To unlink audio and video clips from each other completely, right click on the clip, and select Unlink. You can now manipulate audio and video separately. To relink the audio and video portions of the clip, hold the SHIFT key, click each portion, right click and choose Link. Most of the time you want to leave linking on so you don’t accidentally drag video and audio clips out of synchronization with each other.
## Snapping The small magnet icon on the top left of your timeline turns Snapping on and off(the horse-shoe symbol). With Snapping on, your clips will “snap” into place next to each other. Or you can position the playhead and drag and snap clips to that location. This greatly speeds up editing, especially if you’re working on a small screen, like a laptop. With Snapping off, you can accidentally leave small gaps between your clips. Most of the time, you’ll want to leave snapping on.

Finesse the audio
Now that Audio can make or break your project. Clear sound will keep the viewer engaged. Low audio levels, fluctuations, pops or extraneous noises can be distracting, causing the viewer to lose focus interest in the story.
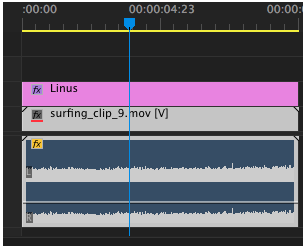
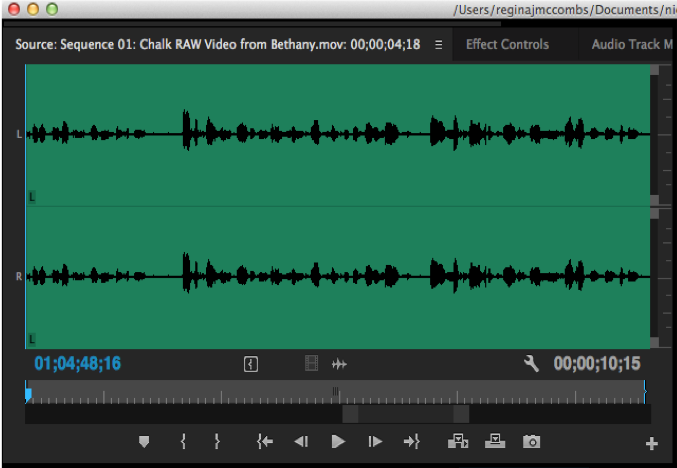
First, make sure you can see both waveforms and your levels control. Click on the wrench icon on the timeline and a dropdown menu will pop up. Make sure both “Show Audio Waveform” and “Show Audio Keyframes” are selected. We can maximum add only three audio files to a video.
Audio levels
Waveforms are the visual representation of your audio, much like a histogram shows the distribution of light in a photograph. They are useful in editing so you can see how high or low the recorded levels are, and what adjustments you may need to make.
If the waveforms are not visible, or the “rubber band” used to control volume is not visible, then use the selector tool to click and drag the track down to make the depth of the track greater.

Audio meters are another representation of levels, measured in decibels (dB). Audio peaks at 0 dB. You never want to see red at the top of your meter, which is 0db. The ideal peak levels for multimedia bounce between -3 and -6. The industry standard for broadcast is -12 decibels from maximum. (The difference is that televisions come with robust amplifiers and speakers, so volume can be increased, while home computers and phones strain to overcome room noise at maximum volume.)
Adjusting audio volumes
When you change the volume in Premiere Pro, it is nondestructive – that is, nothing is changed in your original (source) media file. As with everything in Premiere, there are many ways to change volume. We strongly recommend that you use methods that change the waveform so that you can see that volume has been altered.
Adjust audio levels in a sequence
Audio Gain – For major volume changes, start with the gain control. Right click on the audio clip on the timeline and choose Audio Gain. This dialog will show you what the maximum audio level is. The easiest way to control gross volume is to normalize the audio to a selected maximum volume. Normalizing a clip to -6 decibels instructs the computer to find the loudest section in the file, set its volume at -6 decibels from maximum, and adjust the rest of the clip relative to that sound level.
We can also narrate the video with our own voice by simply pressing the mic symbol in the timeline. we can just place the playhead to the position where we want the narration to start in the video.
Add keyframes
For precise audio editing, such as creating fades and crescendos in our tracks, we can create keyframes in your audio clip using the Pen Tool.
Select the Pen Tool by clicking on the icon looks like the tip of an ink pen on the Tool Palette (or press the P key on your keyboard). Our cursor will change to a pen-like icon when we move it over the horizontal grey audio level line.
We can create keyframes by clicking the horizontal audio level line at the points where we want the audio to begin to change. Then move the Pen Tool over a keyframe, click, hold down the mouse button and drag the keyframe point higher to increase the audio, or drag it lower to decrease the audio at that point. Notice that the line will slope up or down to the other keyframes we’ve created with our Pen Tool, so the audio will fade in or out between the keyframes.
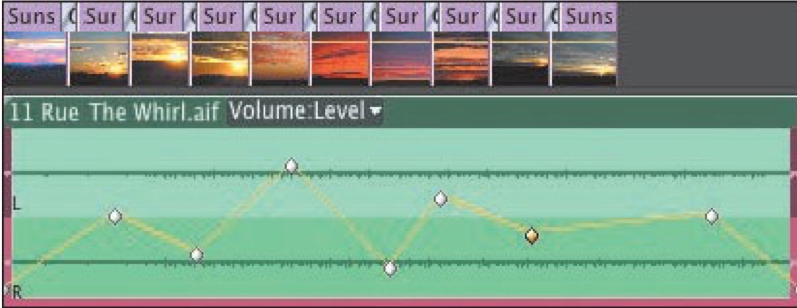
The result of adding and adjusting the position of keyframes up or down on audio clip segments is that the rubber band is reshaped. The higher the rubber band, the louder the sound, the lower the rubber band, the lower the sound.
There is no magic formula for choosing the relative volume of layered tracks (for example interview sound layered over natural sound). Adjust each track until the balance sounds right.
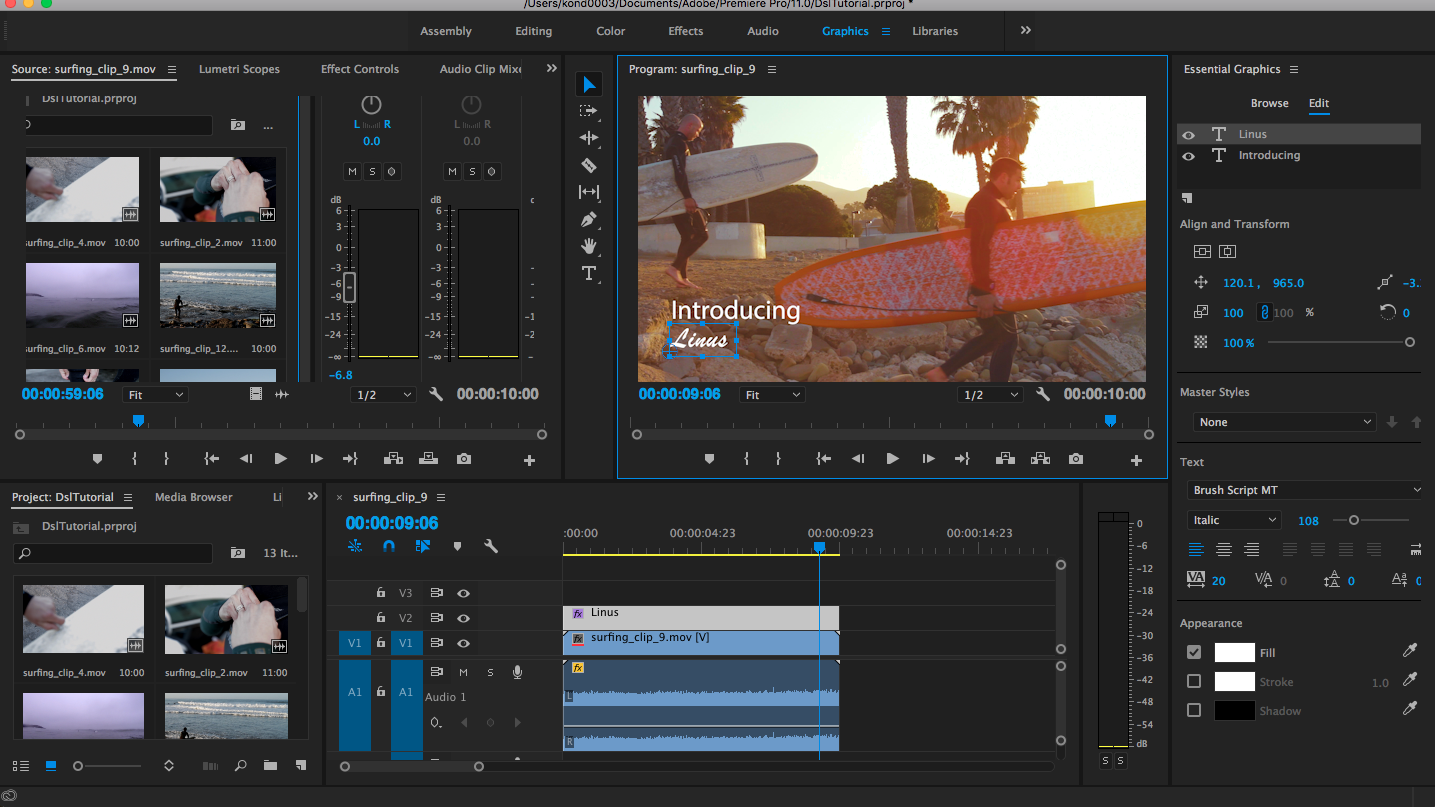
Titles
It’s easy to add screens in between the videos if you want to have titles. The new titling interface (likewise the color correction interface) is much easier to navigate and use on a small screen.
Text is very effective when you need to convey information quickly to your audience. For example, you can identify a speaker by superimposing their name and title during the interview; using what is called a lower-third. You can also use text to identify sections of a long video (often called bumpers) or to acknowledge the cast and crew with credits.
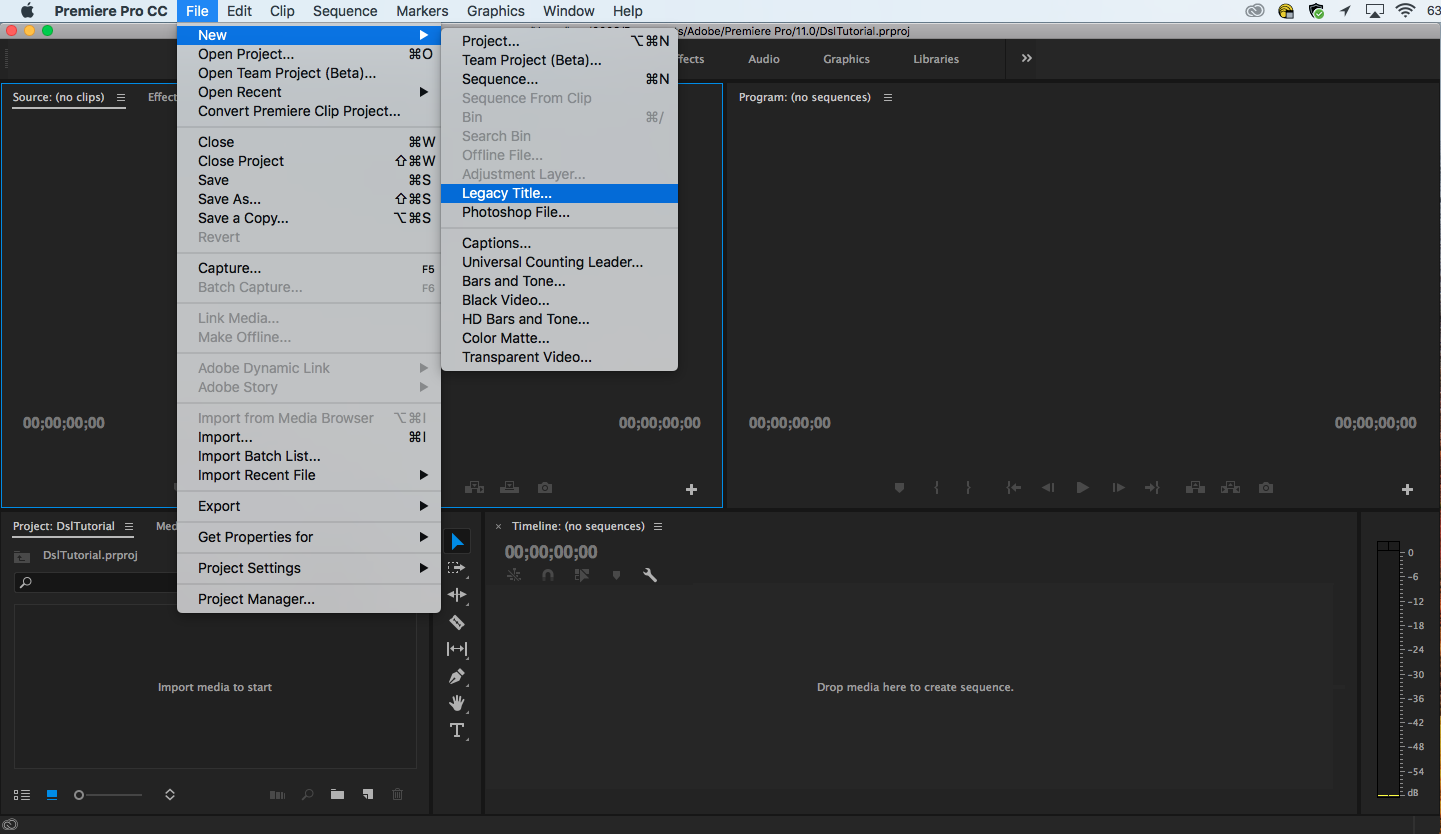
To create a basic new title, first switch from the Editing workspace to the Title workspace. To do this click on the heading Titles located in the navigation menu at top of the screen. Then pull down from File>New>Legacy Title and you will get a dialog box. Make sure it conforms to the format you think you’re working in, give the title a name and click okay. Which looks similar to this
Text has to be on screen long enough for people to read it, but shouldn’t be so jarring or garish that it disrupts the visual flow of the piece. Avoid cutting to a new image with type already on it.
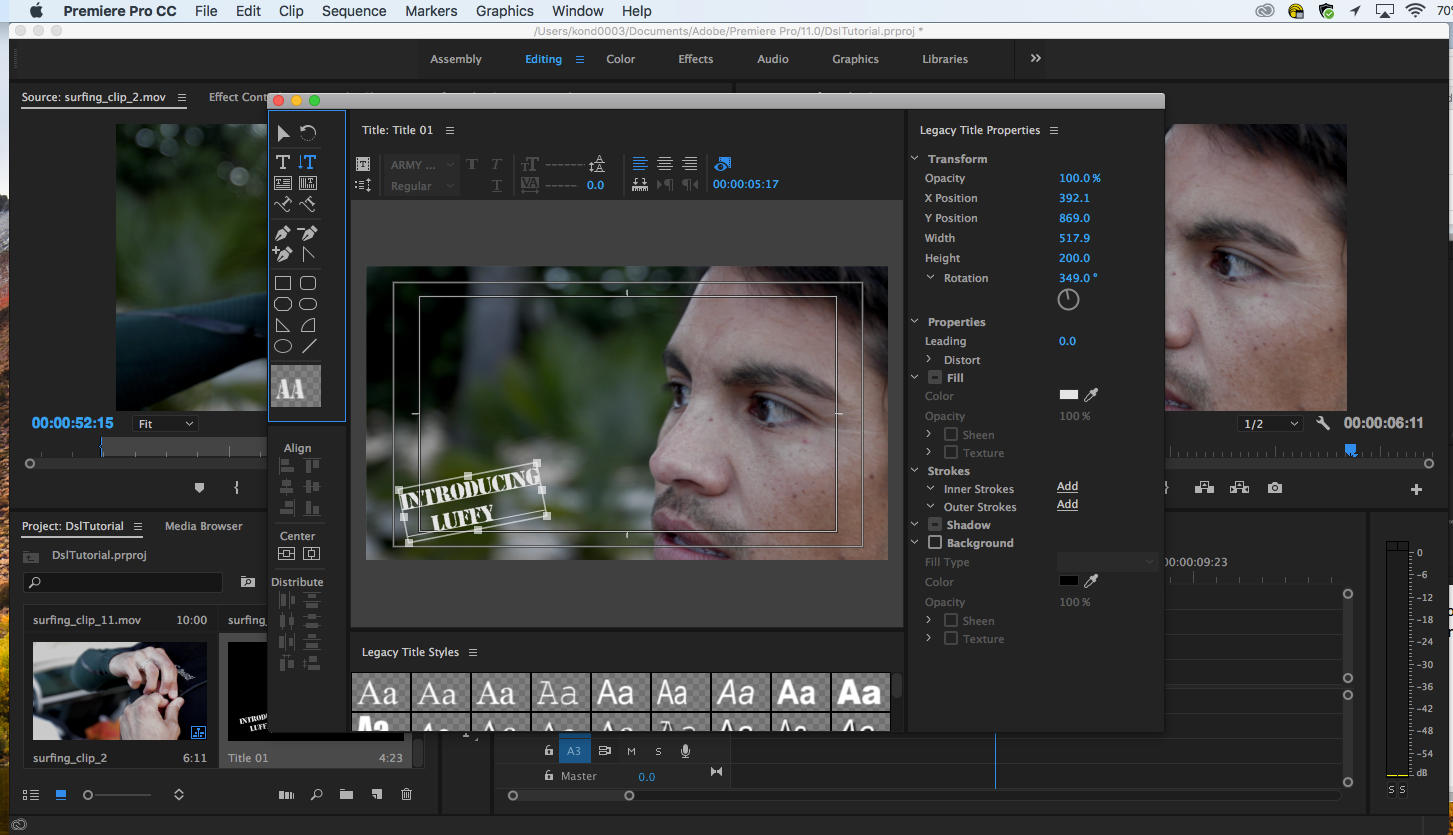
The Titler panel has two box outlines. These designate areas that are “title safe.” That means that a person watching a full screen video on a television is assured of seeing everything inside the title safe box. You can ignore the title safe areas if viewers are only going to see your video in a player on a web page. If there is a full screen option, viewing gets trickier. Most laptops and mobile devices will display all of the video. Less expensive desktop monitors and television monitors tend to encroach a bit on the image. The safest thing to do is to use the larger title safe box as a guide and ensure your type will be visible on almost any device.
Color Correction
We can make colors consistent between adjoining clips so the viewer is not startled or distracted by sudden variations in density, color temperature, hue or saturation.
Start by toggling from the Editing workspace to the Color workspace.
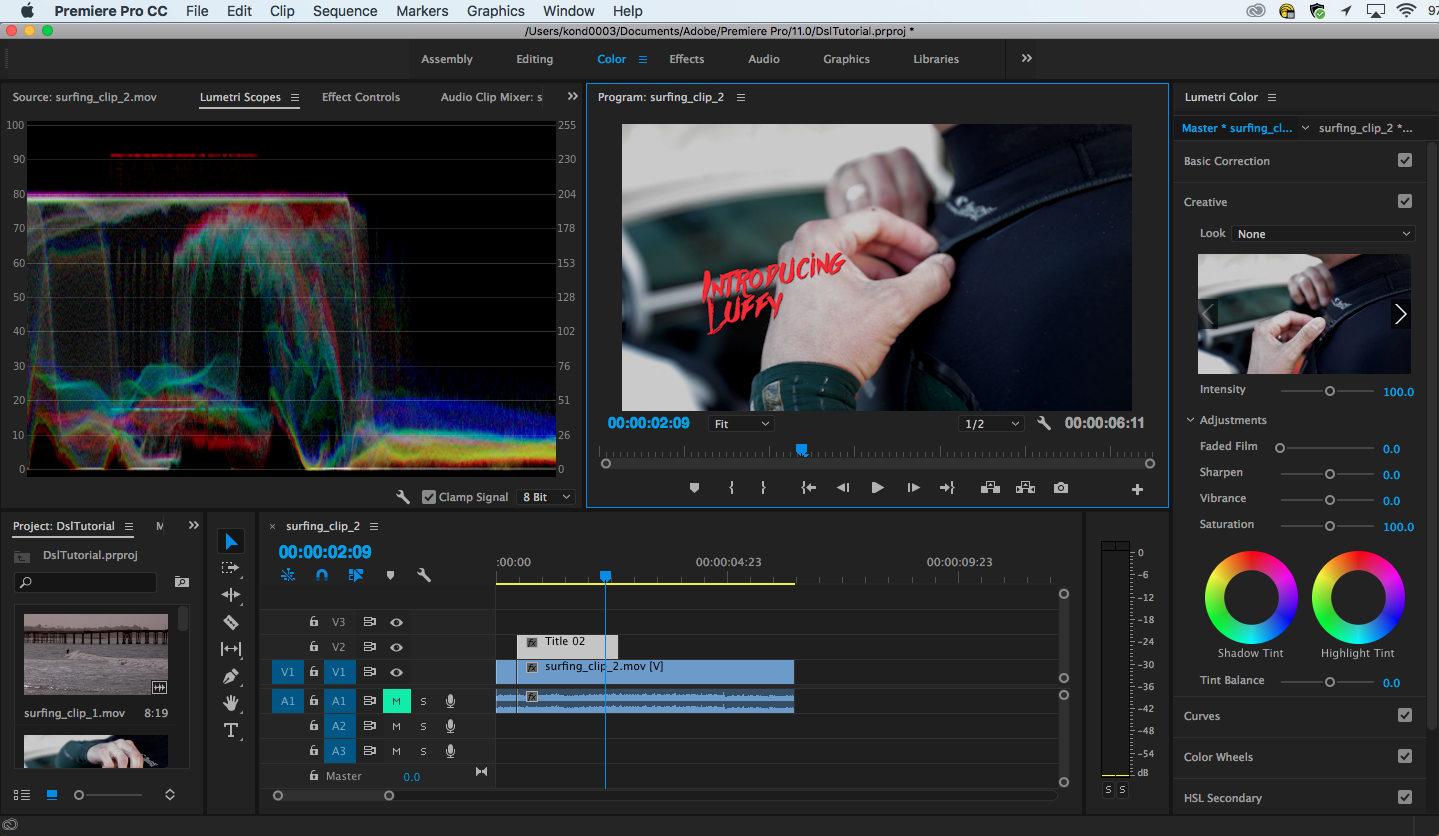
The two panels on the right that you will probably use the most are Basic Correction and Creative.
Basic Correction contains sliders for temperature, tint and exposure. It also has the ability to constrain highlights and open shadows. This is not as powerful as the Camera Raw tool in Photoshop, but it has similar functionality.
The Creative panel lets you adjust color shifts in the shadows or highlights, and to adjust vibrance and saturation.
If you have several clips with common issues you can adjust one, then copy it and paste the attributes onto other clips. Remember to uncheck attributes you don’t want to transfer.
Exporting a project
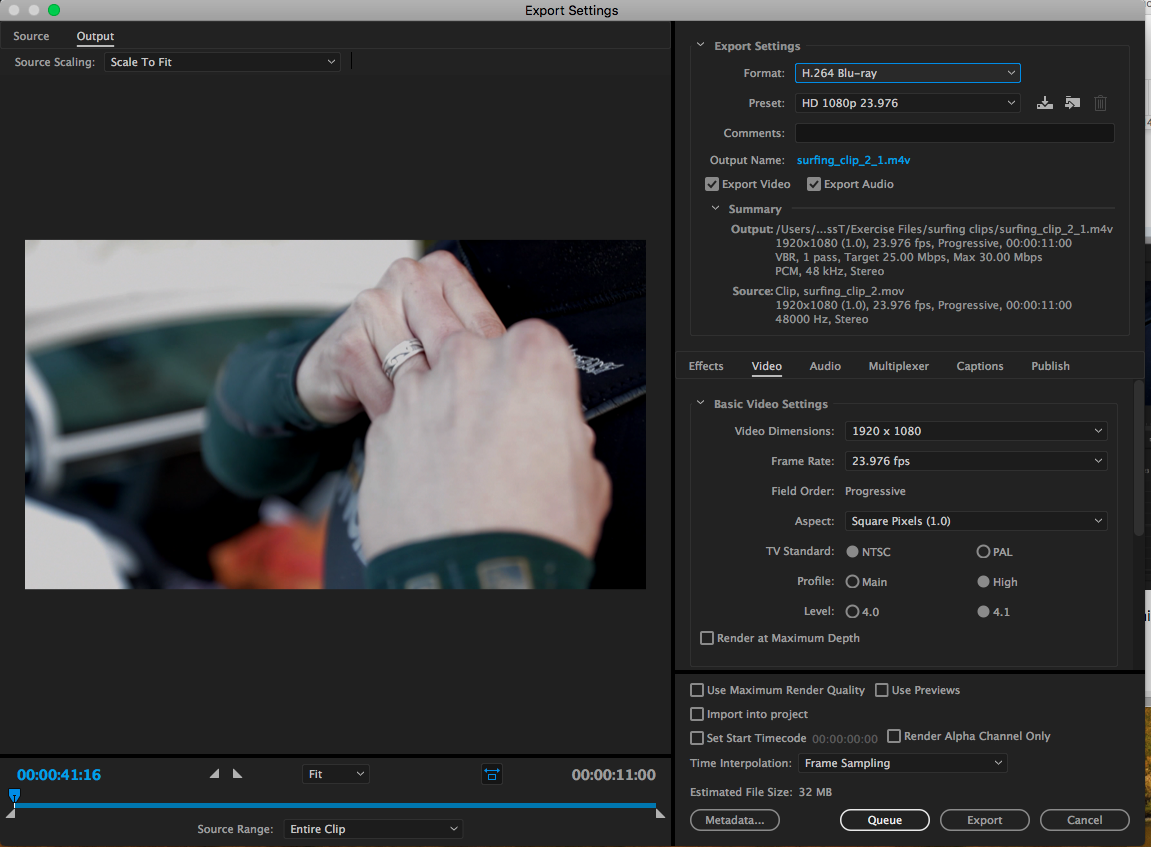
Pull down from File > Export > Media. This dialog box will appear:
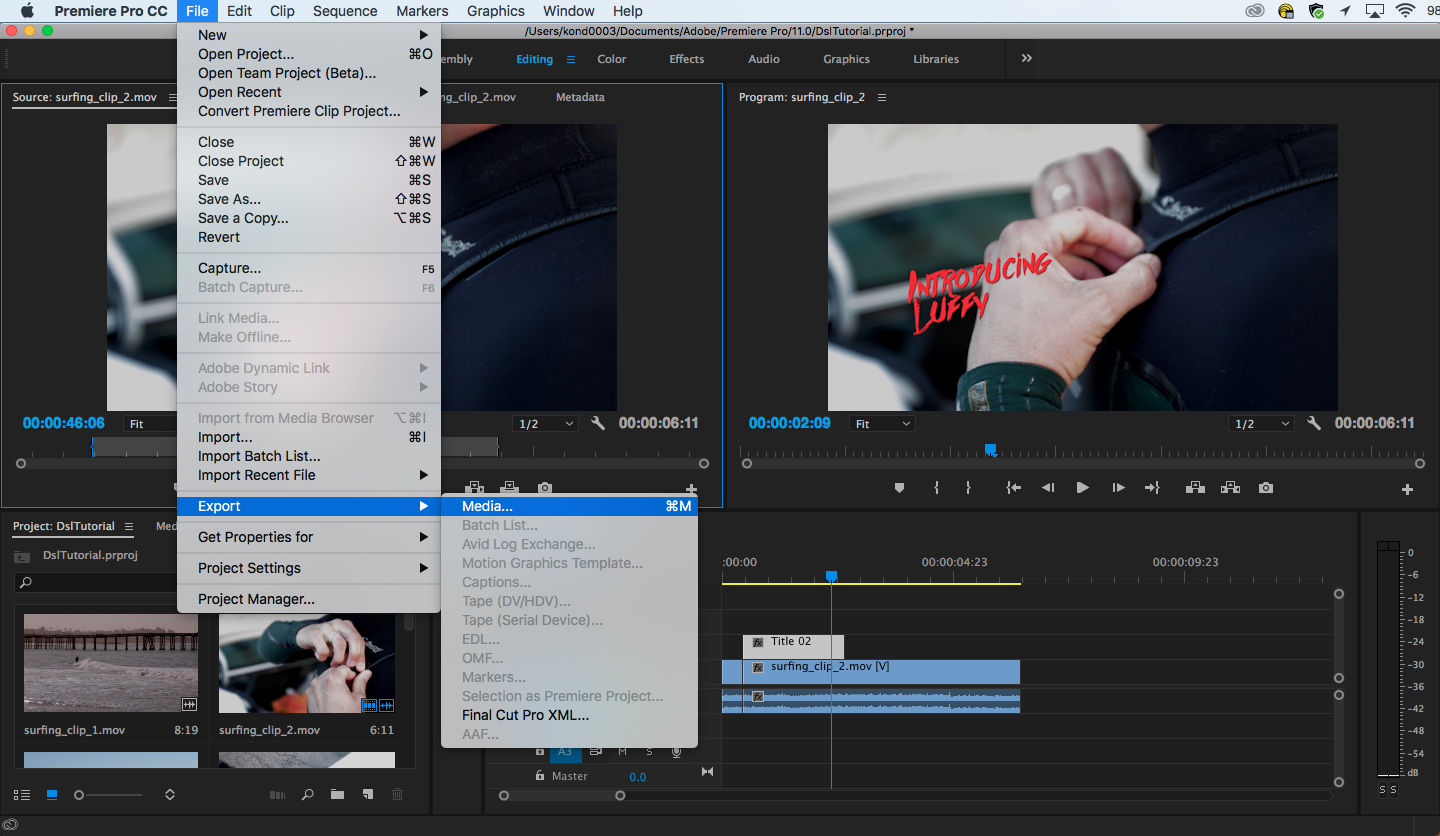
Then check the required format you want from the dialogue box that pops up similar to this and then click export. The time to complete the export varies from system to system and even from one format to another format