
This work is licensed under a Creative Commons Attribution-ShareAlike 4.0 International License.
Maintaining Your WordPress Site with SiteOrigin Page Builder and SiteOrigin Widgets Bundle
The WordPress necessities, for everyone
WordPress is an open source content management system (CMS) and online publishing platform.
While WordPress is certainly simpler and more intuitive than building sites from scratch using html/css/php, it still has its fair share of whizzbangs, doodads, and mumbojumbo to stymie your creative process.
This tutorial will help you navigate the WordPress user interface and augment it with SiteOrigin plugins so that you can harness its full functionality.
Here are some examples of what you can do with WordPress
Table of Contents
- About
- Getting Started
- The Administrator View
- Editing with Wordpress Factory Default
- SiteOrigin Tools
About
Last Updated June 2017
Created by Paul Vieth
University of Oklahoma Libraries :: Digital Scholarship Lab
Getting Started
A note on this tutorial: whenever quotes are used around terms, this signifies that the term used is the term used in the WordPress user interface, and the specific buttons and functions referred to will appear that way in WordPress, so keep an eye on those if you’re having difficult locating a command, WordPress can be clustered and clumsy sometimes
This tutorial assumes you have already registered with WordPress and generated a site, or had someone help you generate your first site, and now the reins are in your hands. If you haven’t done so, there are lots of great tutorials to help you with that process.
The Admin View
Once you have a WordPress account and site, you can access the administive view by appending “/admin” to the end of your site’s url,
- For example: “[yourwebsite.wordpress.com]/admin” or by logging into WordPress and navigating to your site’s dashboard.
For this tutorial I’ll be using the Capra/Bailey Project created by Ben Keppel and Tara Carlisle at the University of Oklahoma.
If you are not automatically logged-in, you will be asked to do so at this point.
After you log in, you will see your site, with the administrative interface laid on top, like this:

For ease of navigation, Wordpress has several redunancies built in. There are multiple ways to perform many of the operations, multiple buttons to get to the same place. Don’t be confused by these reduncancies. For example the site theme, widgets, and menus can be adjusted through the “Customize” interface, or they can be accessed from the dropdown menu labeled with your site’s title, or they can be managed from the appearance section of the dashboard – all perform the same functions, it’s just a matter of personal preference and accessibility.
- The WordPress icon will take you to the WordPress current version homepage where you can learn about the WordPress capabilities now at your disposal. If you hover over it, you can:
- Learn “About WordPress”
- Visit WordPress.org
- Access tutorials, the API, and plugins through the “Documentation” tab
- Visit the “Support Forums” to connect with users like yourself with questions like yours
- Give “Feedback” to WordPress
- The next tab (with the speedometer icon and your website’s title) allows you to access:
- the “Dashboard”
- the “Themes” manager
- the “Widgets” manager
- the “Menus” manager (More on each of these later)
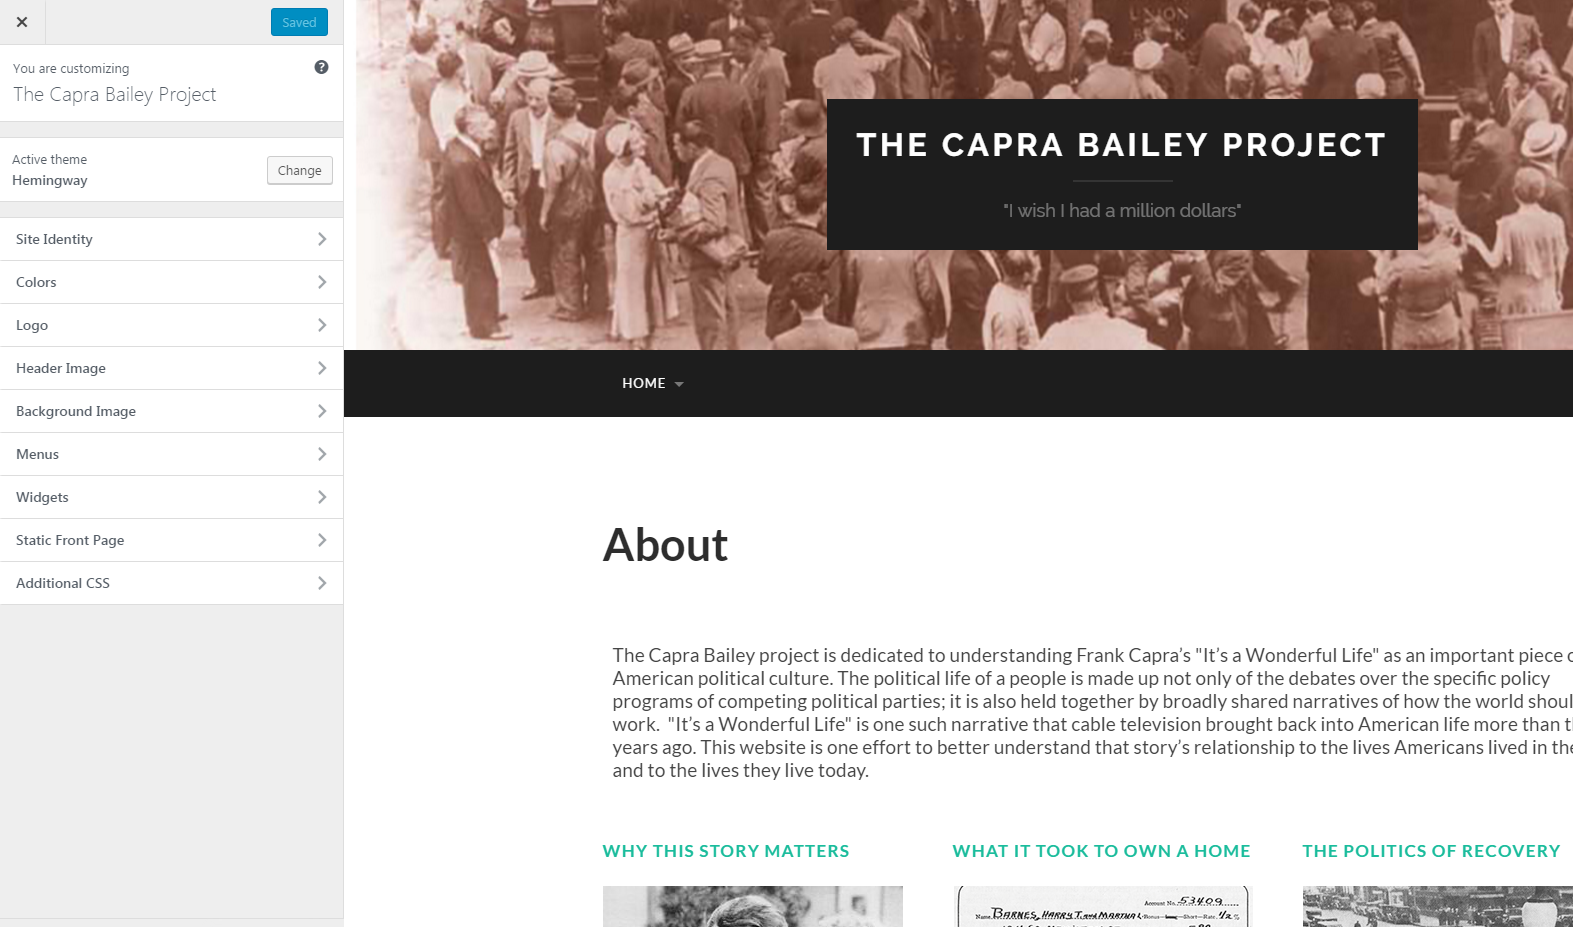
- The “Customize” tab (with the paintbrush icon) allows you to manage:
- “Site Identity”
- where you can change the site title, tagline, and icon
- “Colors”
- background and accent colors
- “Logo”
- “Header Image”
- “Background Image”
- “Menus”
- “Widgets”
- Front Page Settings
- “Additional CSS”
- for customizing your site using cascading style sheets commands
- “Site Identity”
The great thing about the “Customize” interface is that it allows you to preview the changes you’re making in real time, so you can tweak your site with precision and awareness.
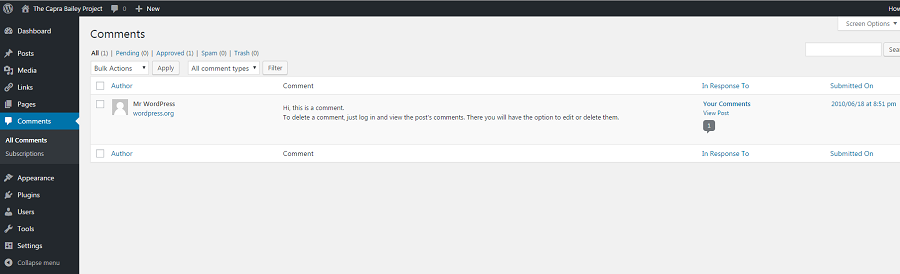
- The comments tab (speech bubble icon) allows you to view and manage comments to your site
- the number beside the speech bubble icon is an alert for new comments
- you can approve, delete, search for, or mark comments as spam
- The “New” tab (+ icon) allows you to quickly and conveniently add a new:
- post
- media file
- link
- including its advanced metadata relationships
- page
- or site user
- The “Edit Page” tab (pencil icon) allows you to edit the page you’re currently on
- You can edit pages by navigating to them using menus and then clicking this “Edit Page” button, or by going to the “Pages” tab in the Dashboard
- The right-most button in the Admin interface is the “Live Editor”
- It is a condensed form of the page editor (the tab to the left of it) that, like the “Customize” interface, allows you to see the changes you’re making in real time
Editing with WordPress Factory Default
- Navigate to the editor of an existing page, or create a new page to play with.
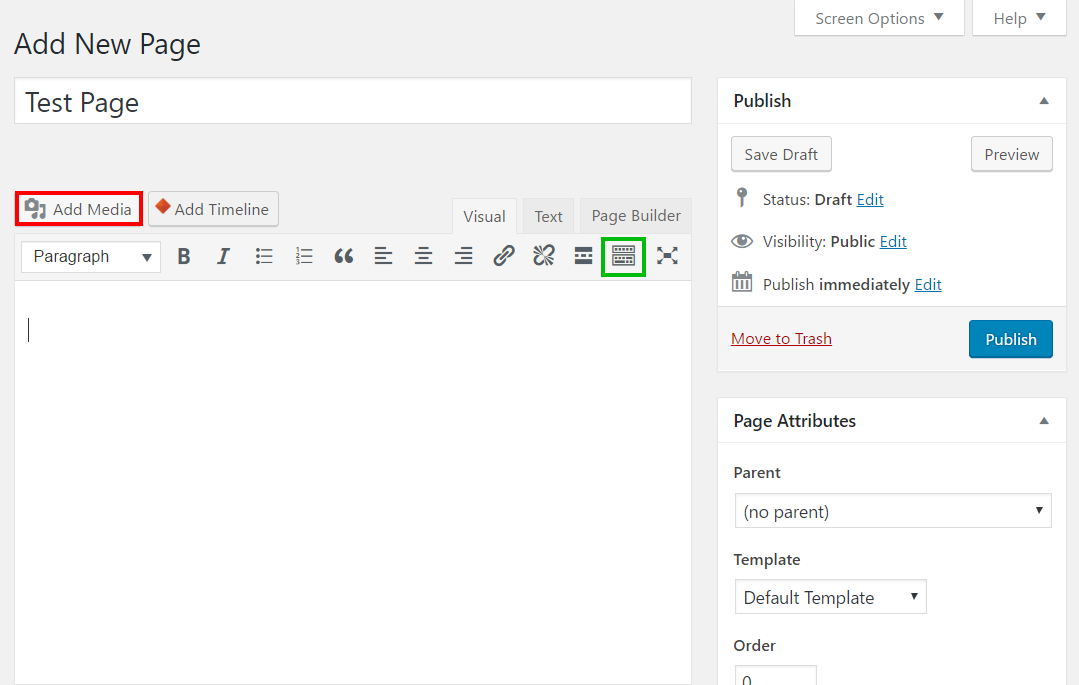
You should see this:
What You See Is What You Get (WYSIWYG)
This means that everything you can do to a WordPress page is right before your eyes (until you augment its abilities with plugins, of course; more on this later).
Let’s study this above image.
- At the top underneath “Add New Page,” you can change the title of the page (mine is called “Test Page”)
- In the top-right you’ll see the “Publish” window where you can:
- “Save Draft” to lock in your changes without publishing them to the web
- “Preview” the page to see what it will look like to your audience while you’re making it, again, without having to actually put it out in the wild
- Change the page’s status:
- “Draft”
- “Pending Review
- Change the page’s visibility:
- “Public”
- “Password Protected”
- “Private”
- Change the page’s publishing timeframe
- It can be published right away, or you can set it to publish at an exact moment in the future
- You can delete the page in the “Publish” window (“Move to Trash” in red)
- AND, most importantly, this is where you set your creation free with the blue “Publish” button
- In the bottom-right you’ll see the “Page Attributes” window (below the “Publish” window) where you can:
- assign a “Parent” to the page (this will make the page a sub-item to its parent so you can create an organizational hierarchy for your site)
- choose a template for the page
- set the page order (of appearance relative to other pages)
- Now for the Important Part – Creating and Editing Content with the Wordpress Default Editor
- This works much the same as most word processors, and uses the standard icons, with which you can:
- bold or italicize your text
- set the text type (different sizes of headings, plain paragraph)
- create ordered and unordered lists
- insert block quotes
- insert/break hyperlinks
- align the text (left, right, and center, but not justified)
- Pay attention to the “Toolbar Toggle” button (highlighted in green in the above image), this brings up additional useful editing options, where you can:
- change the text color
- increase/decrease indents
- insert special characters
- insert a horizontal line
- other good stuff (play around!)
- This works much the same as most word processors, and uses the standard icons, with which you can:
Text isn’t the only kind of content. The WordPress WYSIWYG (again, the stuff that comes with) allows you to import media with the “Add Media” button (camera/musical note icon) – highlighted in red in the above image
When you click the “Add Media” button you’ll see this window open:
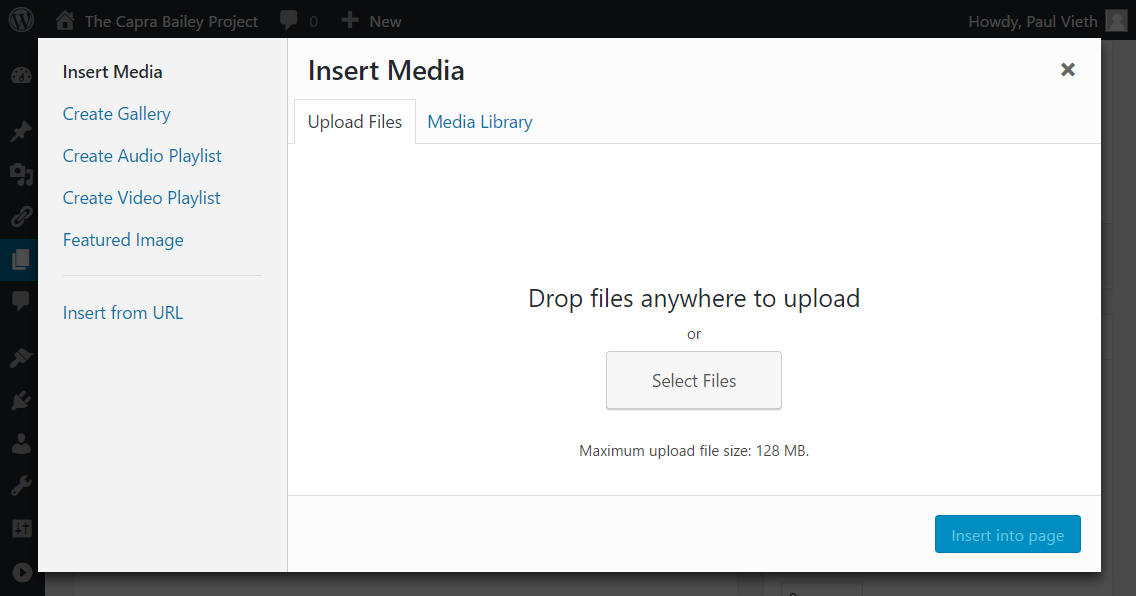
- This allows you to:
- Drag and Drop from or browse for files on your device
- “Insert from URL” to grab publicly-available media online
- select media already uploaded to your WordPress site directory with the “Media Library” tab
- You can use any media you import to:
- “Create Gallery” of images
- “Create Audio Playlist”
- “Create Video Playlist”
- Or select a “Featured Image” to represent the page visually
Let’s add an image to practice.
Here is an image from the Wikimedia Commons (free to use and modify!): University of Oklahoma Campus Image
- Copy the image URL (right click the link above and click “Copy image address”)
- In the “Add Media” window (above), click “Insert from URL” (from the lefthand menu)
- Paste the image URL into the appropriate box at the top of the window, you’ll see a preview of the image and a set of image properties pop up, like this:
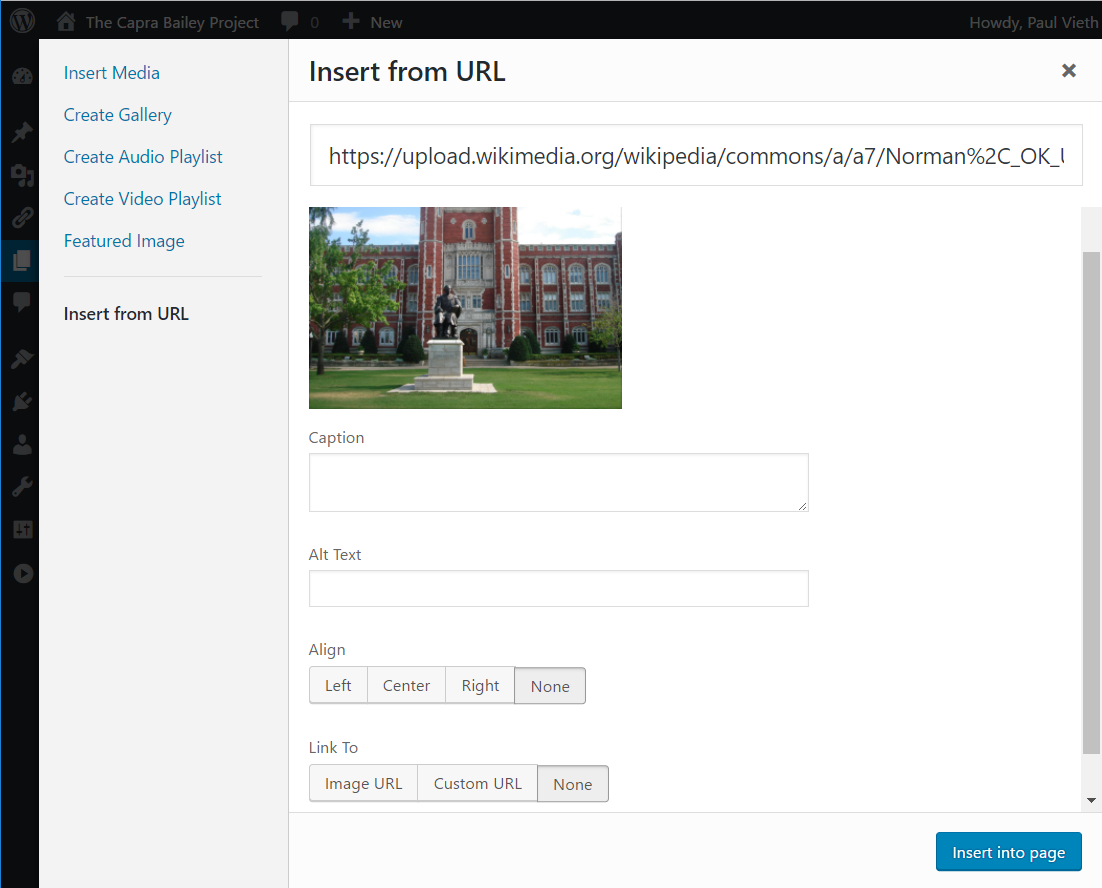
- From here you can:
- Set a “Caption” for the image
- Set the “Alt Text” for the image. This is what search engines will look for and what will be read to visually-impaired persons when they’re on your site, so this is very important
- “Align” the image (left, center, right)
- Set the image to “Link to” an external URL, somewhere on your site, the source of the image, or nothing.
When you’ve set the image’s properties, click “Insert into Page” – the blue button at the bottom-right of the window.
Now the image will be displayed in the basic (WYSIWYG) editor. The caption will be underneath the image.
Any content you add, either text or multimedia, will display in the editor as you arrange it. This is how the content will appear on your page after you’ve published it.
To Edit the Image
- Click on the image shown in the editor
This will bring up a pop up window with a row of icons:
- four alignment buttons (left, center, right, none)
- an “Edit” button (pencil icon)
- a “Remove” button (“X” icon)
If you click the “Edit” button (pencil icon), you can change all of the properties we discussed above, but you can also set some [Advanced] properties, including CSS classes for the image and its link, or, usefully, you can select a box to “Open link in new tab.”
This covers the WordPress factory default editing functionality. WordPress is a powerful composition and publishing tool, but it is limited. In the next section we’re going to augment the capability of WordPress with the SiteOrigin plugins, with which you’ll begin to fully experience what a web content management system can do.
SiteOrigin Tools
Installing SiteOrigin Plugins
This tutorial is primarily concerned with the SiteOrigin “Page Builder” and “Widget Bundle” plugins. If you do not have these plugins installed, do so by:
- going to your WordPress Dashboard
- click “Plugins” from the menu on the left of the screen
- click “Add New” under the “Plugins” menu item, or the “Add New” button next to the “Plugins” page header
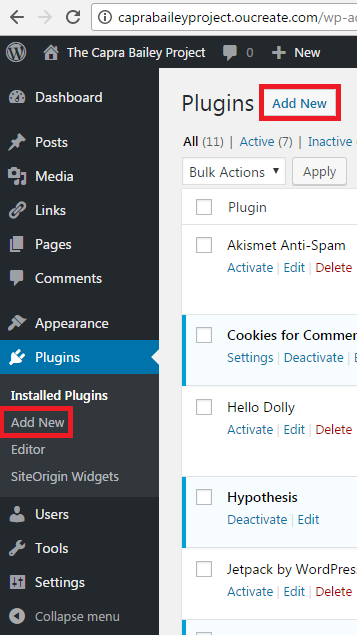
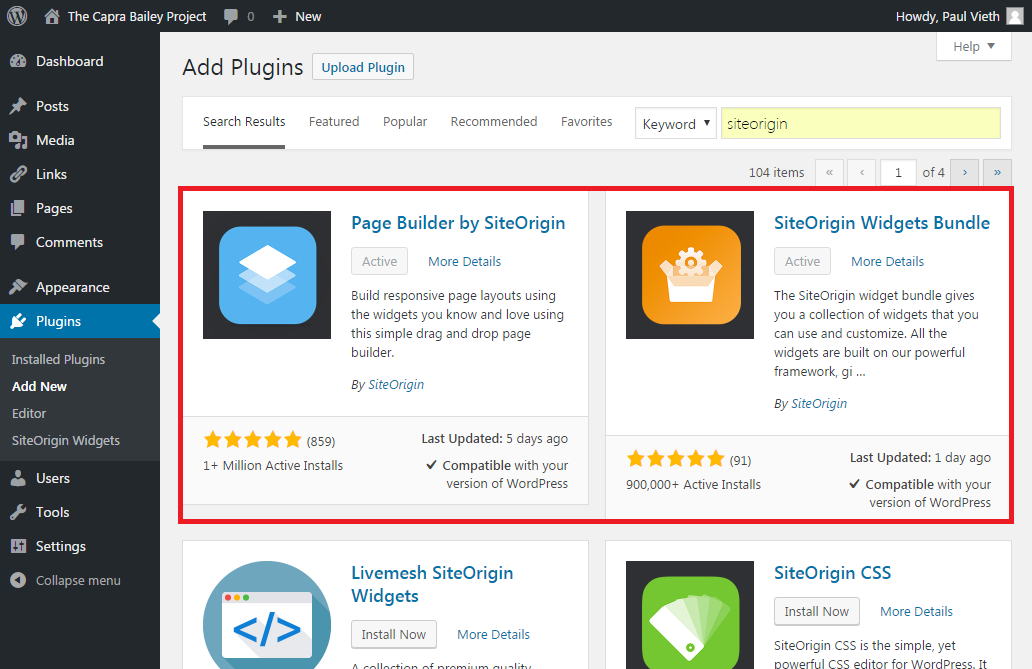
- In the top-right corner of the screen, in the “search plugins…” bar, search “siteorigin.”
The first two results will be “Page Builder by SiteOrigin” and “SiteOrigin Widgets Bundle.”
- Install both of them with the “Install Now” button in the top-right corner of each plugin tile.
Page Layouts with SiteOrigin
Navigate to the editor of an existing page, or create a new page to play with your new SiteOrigin plugins.
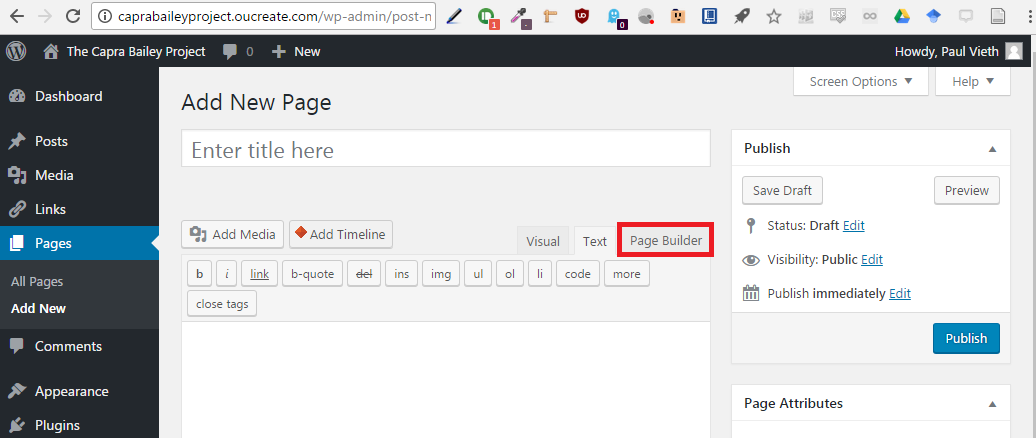
You’ll see the basic “New Page” editor where you can add media or text (the one we played with in the previous section). At the top right of the editor box, you will see three tabs: “Visual,” “Text,” and “Page Builder.”
- Click the “Page Builder” tab
There are three main things you can do with the SiteOrigin plugins:
- Use a prebuilt layout
- Design your own layout with the “Row” or “Add Row” (three horizontal bars icon) buttons.
- Add widgets to your layout
The prebuilt layouts handle themselves. All you have to do is browse for one you like and populate it with widget-based content.
We want to make our own custom layouts, though, so we can have the capacity to mould our sites to our imaginations.
- Click either of the “Add Row” buttons
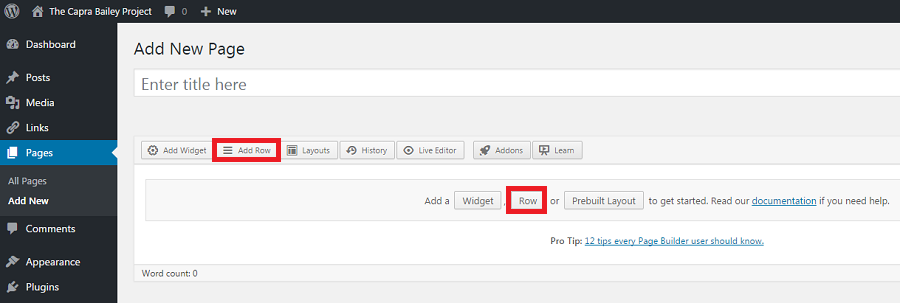
This will open the “New Row” window
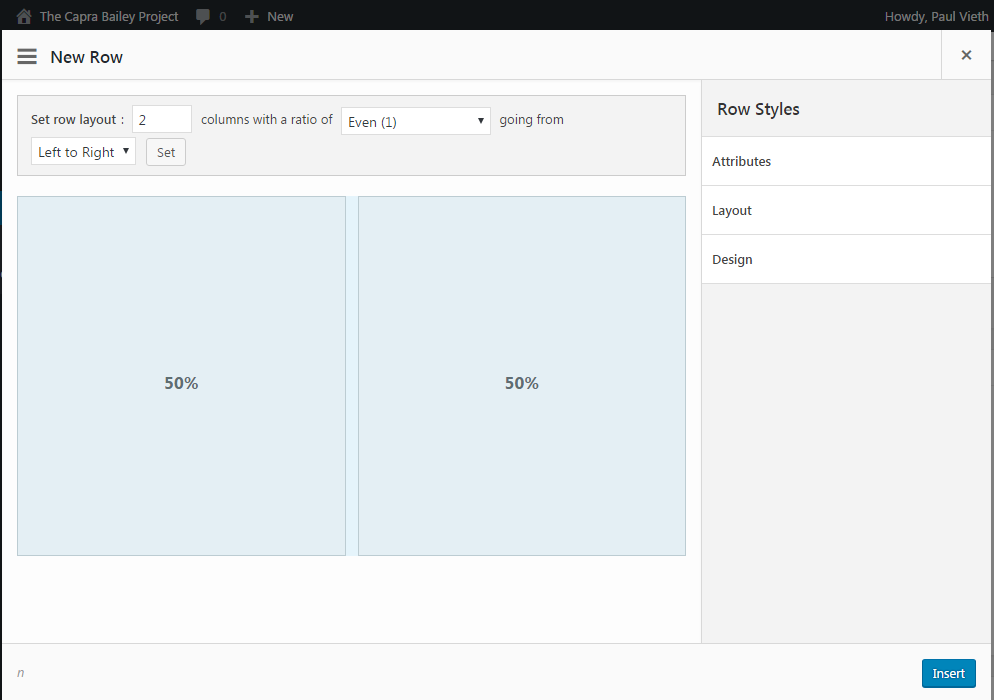
SiteOrigin Page Builder allows you to arrange your content using a grid system. That is, you will build your page one row at a time; for each row, you will be allowed to determine the number of columns in that row, as well as that row’s stylistic properties within the parameters allowed by SiteOrigin Page Builder.
The “New Row” window allows you to:
- set the number of columns (1-12)
- set the relative widths of the columns
- either from a dropdown menu of preset ratios (including “the golden”!)
- or manually by hovering between the column previews (in the light blue) and clicking and dragging to the desired ratios
- [ADVANCED] Change the style properties of the row
- Attributes
- assign the row/cell an id/class to be referenced other places in code
- to manipulate the css properties for the row
- Layout
- margins
- padding
- screen-size response properties (how the layout changes when the page is viewed on a mobile device)
- Design
- background color/image and its properties
- Attributes
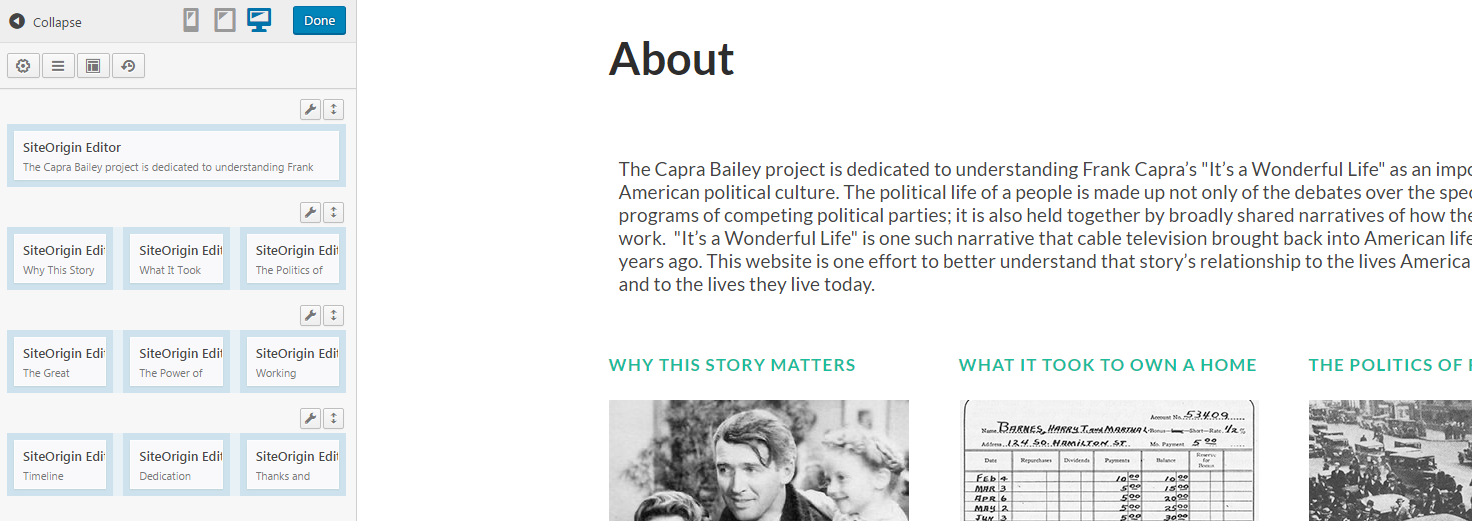
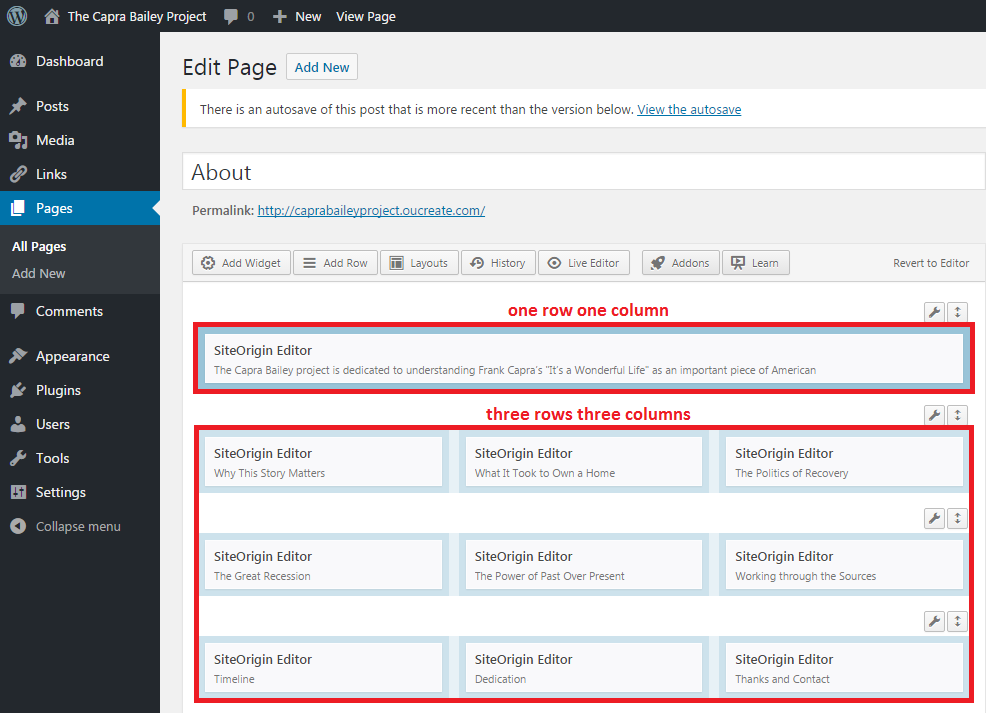
For example, the Capra/Bailey Project homepage uses the SiteOrigin Page Builder (pay attention to the content pane below the menu).
The Capra/Bailey Project homepage is composed of one row of one column containing the site introduction text, then three rows of three columns each – creating a gallery of images representing and linking to the various sections of the site.
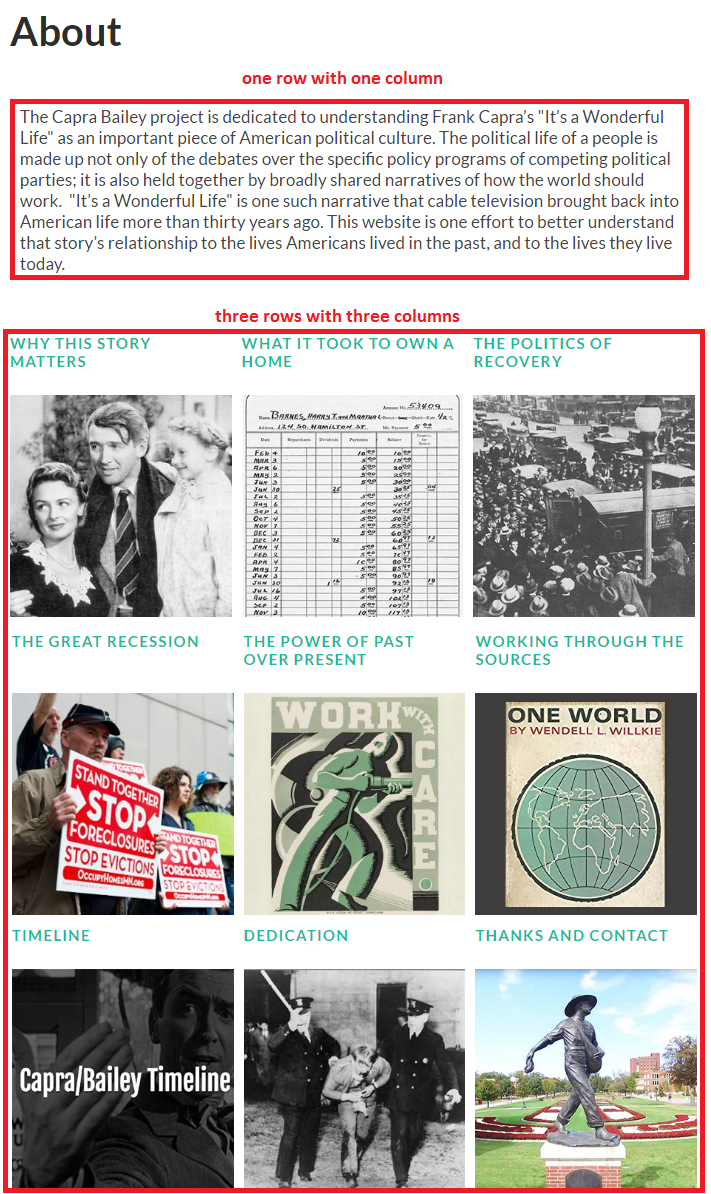
This is what that same layout looks like in the SiteOrigin Page Builder editor:
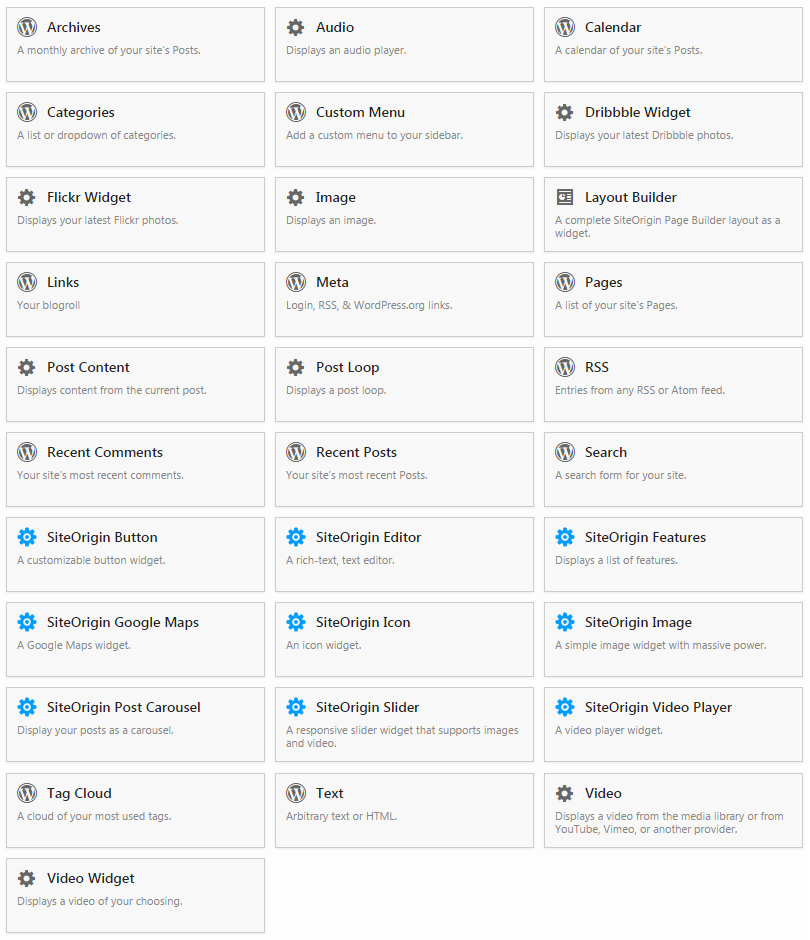
SiteOrigin Content Widgets
Now that you have a page structured using SiteOrigin Page Builder, you’re ready to fill that structure with content. This is where the SiteOrigin widgets come in.
Below you’ll find all of the widgets included in the SiteOrigin Widget Bundle. I believe the explanations provided for each widget take care of themselves, so we don’t need to go into that, but I really encourage you to play around with these. Between the layouts you can create using SiteOrigin Page Builder, the stylistic settings that can be applied to each row and column, and the multitude of content types you can infuse into those stylized layouts, your ability to codelessly create beautiful, dynamic, and multimodal websites is greatly enhanced with the SiteOrigin plugins.
Let’s practice adding a widget so we can solidify the process.
- Start by clicking the “Add Widget” button in the top-left of the editor pane
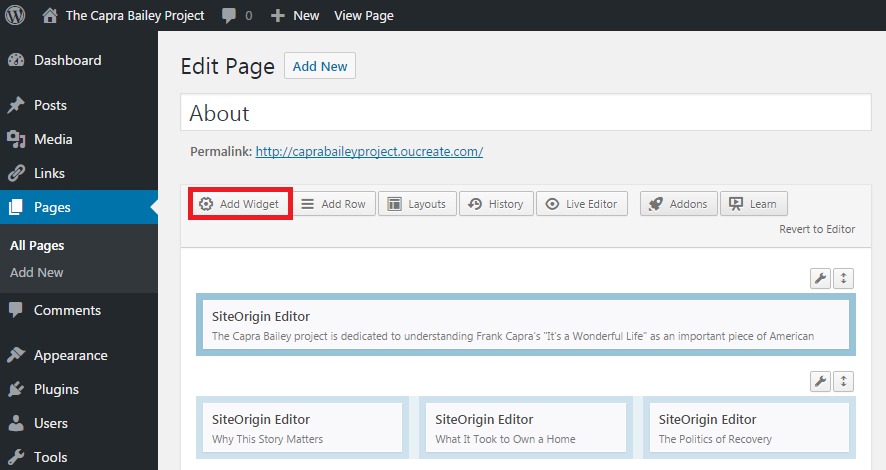
You’ll see the same list of widgets I showed you a moment ago.
For the purposes of this tutorial, let’s add an image to our page.
- Select the “SiteOrigin Image” widget (one of the widgets with a blue gear icon)
- you can also use the factory-standard “Image” widget (grey gear icon), but I recommend the one from SiteOrigin
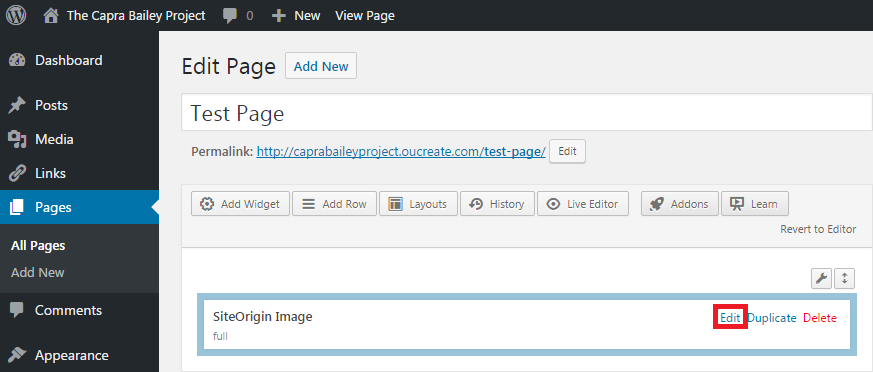
It really helps to have your site layout in place before you go throwing content onto the page, but if you don’t have a layout, any content widget you call to action will plop down onto your page into an automatically generated row automatically set to one column. It’s okay if you haven’t made a layout before throwing a “SiteOrigin Image” widget onto your page. You can always go back and edit these auto-generated rows to change its arrangement, alignment, number of columns, and aesthetic.
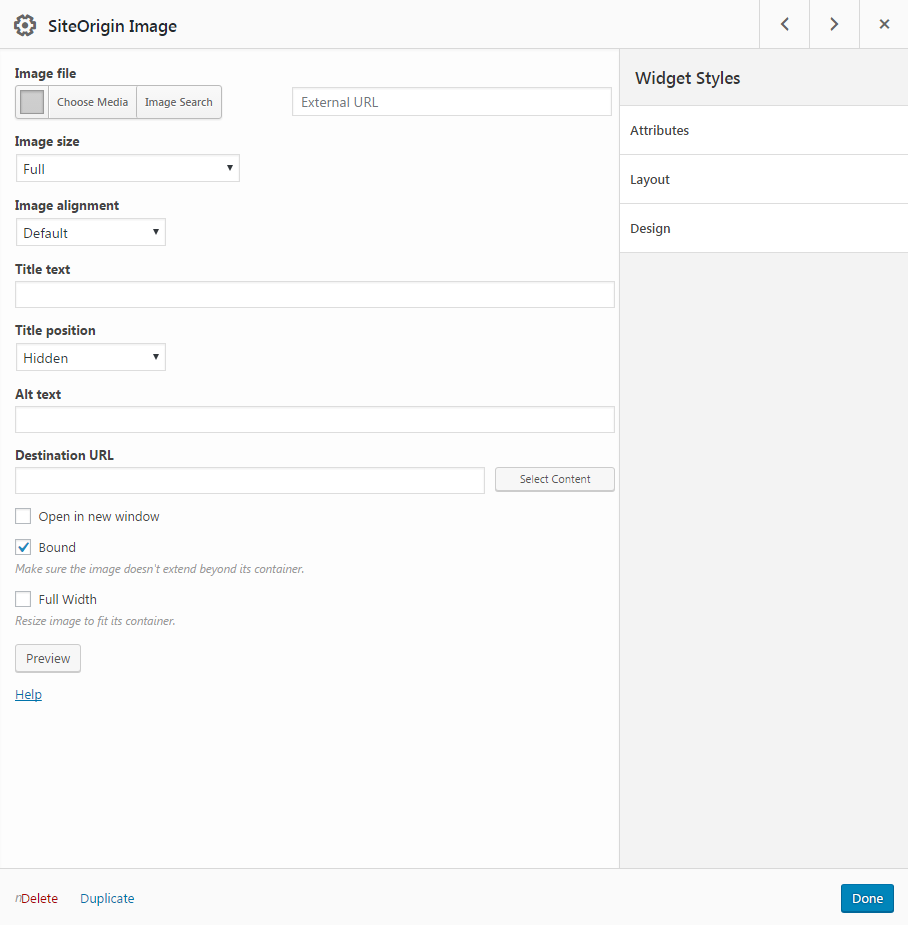
- When you add the image widget, it just creates a container for the image on your page, now you have to select the images and customize their properties. Hover over the new container (The inside will turn from light grey to white, and “Edit,” “Duplicate,” and “Delete” buttons will appear in the top right corner of the container. Click “Edit.”
From the window that opens (below), you can:
- choose/change the image
- change the image display size
- alignment
- title
- Alt text
- this is important because it’s what search engines prowl for, and what is read to the visually impaired as they auditorily consume your site
- choose/change the image’s destination URL
- this will turn your image into a link (to another part of your site or an external site)
- lots of other style and formatting configurations
- The same basic process applies no matter what type of content you’re adding
- click “Add Widget”
- select the widget appropriate for the type of content you’re displaying
- arrange where in your layout you want the new content to be generated
-
use the edit widget button to select and configure the content and its display properties
SiteOrigin Editing Overview
Just to review, below you find all the functions you might need to perform to fully exploit the SiteOrigin Page Builder and Widgets plugins for WordPress. Don’t get overwhelmed by the minefield of buttons. And remember, take you website building one step at a time – you can always change or undo anything.
